If your network doesn't do networking anymore - and it comes down to the Windows IP Stack, try reseting it this way:
(In Admin CMD):
netsh int ip reset C:\netsh.log.txt

netsh winsock reset
After that, reboot
IT Systemelektroniker & Master of Science, IT Security, Networks, Embedded Systems, Docker Campus Ambassador and Raspberry Pi Geek
If your network doesn't do networking anymore - and it comes down to the Windows IP Stack, try reseting it this way:
(In Admin CMD):
netsh int ip reset C:\netsh.log.txt
netsh winsock reset
After that, reboot
In terms of backups, I still love Rsync / DeltaCopy. Rsync is an awesome protocol, as it does only transmit data changes. So it is extremly useful if you are running on an slow dataconnection and try to backup big data chunks or files you are working on. It does save time as well.
The problem: DeltaCopy (which was developed by Synametrics) is not supported anymore and has been replaced by their (non free) tool Syncrify. (And no, the free Personal Edition does not count as a useable alternative!). Problem with DeltaCopy would be the really old Version of the used rsync Part. But don't worry, it is really easy to update that one (and that will resolve many problems including the ones experienced with special character filenames etc).
Martin Edenhauser has got one of the latest versions of rsync for windows as download on his blog: http://it-em.net/joomla/index.php?option=com_content&view=article&id=49&Itemid=54cms/front_content.php - just go there, grab the 3.0.9 (or other latest version) and unzip it into your C:\Program Files\Synametrics\DeltaCopy folder, overwriting the old files. (And don't forget to do it on the Server Side as well, if you are using the DeltaCopy Server as well !)
Thanks Martin for your great work!
Following my work on IPv6 I did create an IPv6 Primer / Presentation for my staff and other technical interessted people. So if you are interessted in an little insight to my work and IPv6, feel free to download this file (German, about 1 MB): IPv6, Nico Maas 2012 PDF
Developing Websites with XAMPP is always neat and nice: Compact package, everything you need is there - and even having it portable on an USB Stick (in an TrueCrypt file ;)) will get you up and running on every Windows PC - where ever you are - in no time. But the problem with this solution comes with the "Host PC": There are a lot of tools nowdays which hijack and use Port 80 (your most beloved Webserver / Apache Standard Port) for their own needs. And so you are quickly on the point of "Apache terminated" in your XAMPP Windows - because of the blocked port. Finding out which program is blocking / using that port is easy, as XAMPP comes with an "Port-Check" Tool which can be used from the XAMPP Control Panel. Other than that, here is the TOP 4 of the most annoyning port blocking apps:
4.) Teamviewer (as commented by Teufelsauge)
A remote desktop tool which can be configured to run as background service, listening to port 80 and 443.
3.) Apache
Yeah, thats right. Some people got an old Apache setup running - set up years ago and forgotten in the background. Sounds stupid, but as most errors are - this is one of the most nasty ones. So check your memory before jumping to wrong conclusions.
2.) Microsoft SQL Server
It is an SQL Server! Not an Webserver! Why the heck would... Yeah, right: It DOES block port 80. Open services.msc from your "Run As" Dialog and look out for "Sql server reporting services(MSSQLSERVER)". Set it to disabled and stop it. Port 80 freed, hurray!
1.) Skype
To bypass corporate security standards and firewalls, Skype can use Port 80 and even Port 443 (SSL) as workaround. And it does that, by default. To disable that, start Skype and go to Tools -> Options - > Advanced -> Connection. Disable "Use port 80 and 443 as alternatives for incoming connections".
To show active stationary wifi accesspoints, use following command:
netsh wlan show networks mode=bssid in the commandline.
Very helpful to get shown the current wifi situation for a customer within going out to him/her with Ekahau or another site survey tool.
We just got an Netgear WNCE2001 - and the need to support it.
Basically, its an Wireless -> Ethernet Converter which does bridge an WIFI Network to an LAN / Ethernet Connector.
You need to install it via WDS System or - plug it into an PC / Laptop, DHCP Client on and configure it via Webbrowser before using it on an "dump" ethernet-only device. Problem: The device itself asks for an IP Adress (to be configured after inital stage) and the connected Ethernet Client does ask itself again - some DHCP Servers don't like that behavior, as far as it seems. So, our workaround was following: Giving the WNCE2001 an static assigned IP by the DHCP Server and "blocking" another IP for the Client. The Client has been configured statically and does now work as it was intended to be.
Notes:
"First" Client Adress internal DHCP Server of the WNCE2001 does offer before inital Configuration: 192.168.1.100
IP of the WNCE2001: 192.168.1.251
DNS: http://www.mywifiext.com
Version: 1.0.0.26
/UPG_upgrade.htm
/MNU_menu.htm
1.) Find an suitable image on cisco.com [i.e. s72033-adventerprisek9_wan-mz.122-33.SXJ1.bin ]
2.) Copy the image to the CF of active Supervisor by TFTP or FTP
copy tftp://IP/images/s72033-adventerprisek9_wan-mz.122-33.SXJ1.bin disk0:
3.) Verfiy the image against the MD5 and internal checksum
verify /md5 disk0:s72033-adventerprisek9_wan-mz.122-33.SXJ1.bin
verify disk0:s72033-adventerprisek9_wan-mz.122-33.SXJ1.bin
4.) Delete old Software on active Supervisor CF
del sw1-slot5-disk0:s72033-ipservicesk9_wan-mz.122-33.SXI5.bin
5.) Unconfigure other Boot Images
conf t
no boot system
config-register 0x2102
boot system flash disk0:
end
copy running-config startup-config
6.) Reload active Supervisor
redundancy reload shelf 1
7.) Wait for the ex-Active to come up again on local Console, sh redundancy should tell you that the ex-Active is now in Cold Standby as there is an Image mismatch. Thats ok, Image does work, so now lets swap the CF cards
8.) Reload now active Supervisor
redundancy reload shelf 2
9.) Wait for the second System to come up again, the VSS should run again in Active / Standby Hot Mode
10.) Copy Bootimage from shelf2 (with CF of shelf1) to shelf1 CF
copy sw-2-slot5-disk0:s72033-adventerprisek9_wan-mz.122-33.SXJ1.bin sw-1-slot5-disk0:
11.) Delete other old images form shelf1 CF
12.) Done
Not the best / Cisco way, but it should hold your Active / Standby Config in right order.
On 16.06.2011 Microsoft fixed an Security Issue with Samba which ended in Windows Users beeing unable to access Unix Samba Shares by using Plain Text Authentication.
By removing Security Update KB2536276 and rebooting you can enable your client again - or you patch your samba server, which is the real source of error - Microsoft did just fix an flaw.
https://bugzilla.samba.org/show_bug.cgi?id=8238
https://bugzilla.samba.org/attachment.cgi?id=6593
Infos taken from:
http://answers.microsoft.com/en-us/windows/forum/windows_xp-windows_update/kb2536276-windows-xp-pc-get-system-error-58-when/d9dbdde5-2666-4423-b47c-fbdb80b995d9
An "Multi-Tab" Putty Version?
Does that exist?
No - putty does not do tabs, neither any custom version.
But theres an so called "Putty Connection Manager" which does mange your Sessions 256 bit AES encrypted as well as do Multiple Tabs via wrapping Putty multiple times within itself!
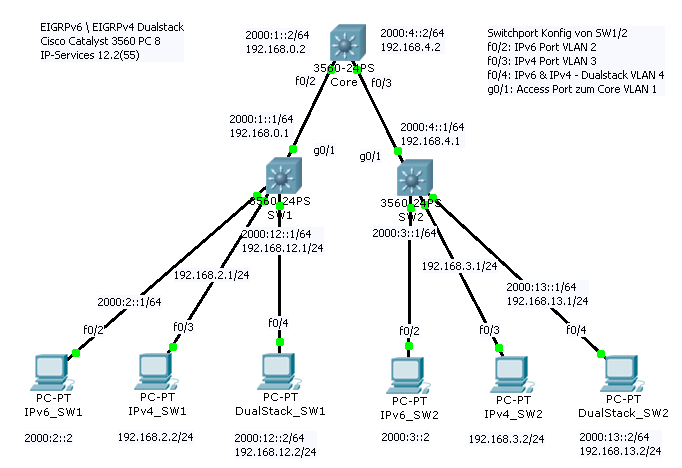
IPv6.
Everyone is talking about it.
And not too soon, ppl will need it.
As my corporation needs to switch to v6 soon, I'll started to work into this hexadecimal notated nightmare ;-).
I'll got some basic stuff written down already - but I'm not feeling like starting off IPv6 in my blog with too much boring theory.
So lets jump into a full blown network! ^^
Tada!
Well - its not too "full blown" - but a working network at last: We got our Routers, Switches, PCs and EIGRP - and an Application thats driven by IPv4 and IPv6 called "ping" and "ping6" - thats something, ain't it?
But first: What is Dual Stack? Well. Thats an easy one: Running your network on Dual Stack does mean using IPv4 and IPv6 in co-existence. Nothing more and nothing less. Your normal Ethernet Switch does Switch IPv4 and IPv6 the same - as Layer 2 does not differ between both. Layer 2 is MAC, IPv4/6 do come in mind on Layer 3 - to the Routers mind, so to say.
Sadly, I don't had any Cisco 1841 or similar machines for this project - and I did wanted to test these settings in an rather small Lab before jumping to our "spare" Cisco VSS Team and hacking that thing to kingdom come. Therefore, I used serval Catalyst 3560 PC 8, which are small Cisco Layer3+ Switches and could replace the routers.
To get the Switches to become IPv6 Routers, we need to install an new IOS with IP-Services Feature Set or higher. You can do that be erasing the Switch flash and download an new IOS by using the archive sw command from an tftp ( archive download-sw /allow-feature-upgrade /reload tftp://IP/c3560-ipservicesk9-tar.122-55.SE.tar ). As you see, I did use the 12.2(55)SE Firmware, as the new 58 got some really nasty changes in Terms of Smartport Features.
After our Switch(es) did reload, we need to configure an new SDM Template. The Switching Database Manager is not some piece of software, in truth its more some kind of ressource template. By changing this SDM Template, you change the way how the Ternary Content Addressable Memory (TCAM) is seperated. The TCAM is an very small but fast piece of RAM which does save Information like MAC Addresses, Routes, VLANs and so on. If you change the SDM Template, you change the amount of space which is avaiable for an Information. i.e. VLANs. If you choose the "Routing" Template - your Switch will put more memory onto Routes, if you choose the "VLAN" Template, your switch will support more VLANs but disable routing - and if you choose "Default", you get an mix of both. So, SDM Templates can be mission critical. And, they are fixed! You can't change the amount or divison of memory - only which template is used. As we want to use our Switch not only as Layer 2 Device, but DualStack Router, we need to change to an DualStack Routing SDM template - to really support IPv6 and Routing.
int vlan 3
ip address 192.168.2.1 255.255.255.0
no shut
int f0/3
switchport access vlan 3
spanning-tree portfast
no shut
end

