IPv6.
Everyone is talking about it.
And not too soon, ppl will need it.
As my corporation needs to switch to v6 soon, I'll started to work into this hexadecimal notated nightmare ;-).
I'll got some basic stuff written down already - but I'm not feeling like starting off IPv6 in my blog with too much boring theory.
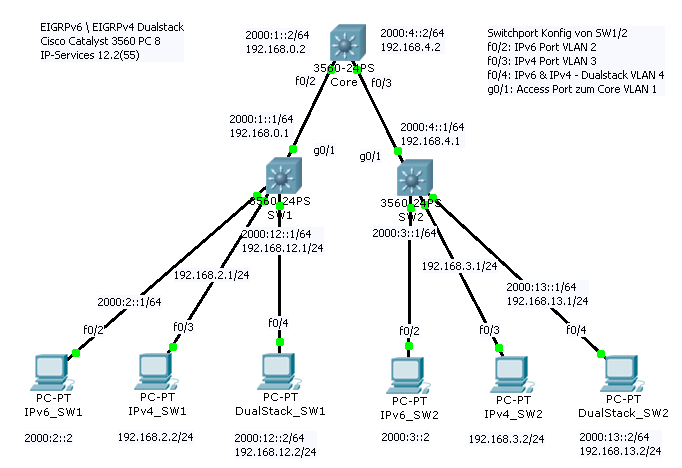
So lets jump into a full blown network! ^^

Tada!
Well - its not too "full blown" - but a working network at last: We got our Routers, Switches, PCs and EIGRP - and an Application thats driven by IPv4 and IPv6 called "ping" and "ping6" - thats something, ain't it?
But first: What is Dual Stack? Well. Thats an easy one: Running your network on Dual Stack does mean using IPv4 and IPv6 in co-existence. Nothing more and nothing less. Your normal Ethernet Switch does Switch IPv4 and IPv6 the same - as Layer 2 does not differ between both. Layer 2 is MAC, IPv4/6 do come in mind on Layer 3 - to the Routers mind, so to say.
Sadly, I don't had any Cisco 1841 or similar machines for this project - and I did wanted to test these settings in an rather small Lab before jumping to our "spare" Cisco VSS Team and hacking that thing to kingdom come. Therefore, I used serval Catalyst 3560 PC 8, which are small Cisco Layer3+ Switches and could replace the routers.
To get the Switches to become IPv6 Routers, we need to install an new IOS with IP-Services Feature Set or higher. You can do that be erasing the Switch flash and download an new IOS by using the archive sw command from an tftp ( archive download-sw /allow-feature-upgrade /reload tftp://IP/c3560-ipservicesk9-tar.122-55.SE.tar ). As you see, I did use the 12.2(55)SE Firmware, as the new 58 got some really nasty changes in Terms of Smartport Features.
After our Switch(es) did reload, we need to configure an new SDM Template. The Switching Database Manager is not some piece of software, in truth its more some kind of ressource template. By changing this SDM Template, you change the way how the Ternary Content Addressable Memory (TCAM) is seperated. The TCAM is an very small but fast piece of RAM which does save Information like MAC Addresses, Routes, VLANs and so on. If you change the SDM Template, you change the amount of space which is avaiable for an Information. i.e. VLANs. If you choose the "Routing" Template - your Switch will put more memory onto Routes, if you choose the "VLAN" Template, your switch will support more VLANs but disable routing - and if you choose "Default", you get an mix of both. So, SDM Templates can be mission critical. And, they are fixed! You can't change the amount or divison of memory - only which template is used. As we want to use our Switch not only as Layer 2 Device, but DualStack Router, we need to change to an DualStack Routing SDM template - to really support IPv6 and Routing.
sdm prefer dual-ipv4-and-ipv6 routing
is the right command for this. You need to reload your switch after this change!
After the reload, we got our "router" ready. So, lets start by setting up our SW1 as EIGRPv4 Router. First we go to our Client Interface (f0/3):
conf t
int vlan 3
ip address 192.168.2.1 255.255.255.0
no shut
int f0/3
switchport access vlan 3
spanning-tree portfast
no shut
end
So, thats our Gateway Link were we'll connect our Windows XP SP3 PC with IPv4 (192.168.2.2 / 24, GW is 192.168.2.1).
Now to the "Router Link" which does connect to the Core Router (g0/1):
conf t
int vlan 1
ip address 192.168.0.1 255.255.255.0
no shut
int g0/1
switchport mode access
switchport access vlan 1
switchport nonegotiate
no shut
end
This link is set to nonegotiate because we do not want the Switches to start an trunk - but route our traffic through EIGRPv4.
Now, we enable EIGRPv4:
conf t
router eigrp 1
network 192.168.0.0
network 192.168.2.0
end
Basically, thats very easy to understand: We start the EIGRPv4 proccess, issuing it the ID "1" (you can choose which you want and need to create EIGRP Borders) and inform it about the direct connected networks on this router (192.168.0.0 on g0/1 and 192.168.2.0 on f0/3). And thats it! If you got EIGRPv4 running on Core and SW2 as well (SW2 with same config as shown here, only different IP Networks, Core is going to have the same configuration as the Uplink Port but with IPv4 192.168.0.2 on the SW1 end and 192.168.4.2 on the SW2 end), you'll have an running EIGRP supported network!
Now that we got EIGRPv4 running, we'll jump up to EIGRPv6!
Actually, its not to different from the old Version but these:
- You do not configure networks in an central EIGRP process, but do configure EIGRPv6 directly on the interfaces
- You do need to "no shut" the central EIGRPv6 process once, otherwise it won't work.
- There are other differences, but not needed to mention here - check google if you're interested.
For our IPv6 Client Network, we'll start off like this (f0/2):
conf t
int vlan 2
ipv6 address 2000:2::1/64
ipv6 eigrp 1
no shut
int f0/2
switchport access vlan 2
spanning-tree portfast
no shut
end
As you see, there is not much difference: We do configure an IPv6 Global Unicast on the interface and enable the EIGRPv6 Proccess with ID "1" (does not interfere with EIGRPv4! They do not "see" each other as they are IPv4 or IPv6 only!) on that Interface. Connected - to an Windows XP SP3 PC with IPv6(2000:2::2/64, GW is 2000:2::1).
Now to the "Router Link" which does connect to the Core Router (g0/1), we need to add an IPv6 Address for EIGRPv6 to work:
conf t
int vlan 1
ipv6 address 2000:1::1/64
ipv6 eigrp 1
end
After that, we need to "no shut" the EIGRPv6 Proccess - enabling it with this command:
conf t
ipv6 router eigrp 1
no shut
end
Yeah, and thats it!
To just give the additional feedback for Win XP SP3:
To install the IPv6 Stack, you can enter ipv6 install in the Commandline.
To add an IPv6 Address to an interface, enter netsh interface ipv6 add address "INTERFACENAME" IPV6ADDRESS in the Commandline ( i.e. netsh interface ipv6 add address "Lan-Verbindung" 2000:2::2 for our IPv6_SW1 PC).
Finally you can check your connection via ping and ping6 for IPv6.
So, I hope you like it.
And for further studies, I attach the config files! ^^
As final job I did attach the interfaces f0/4, which do run Dual Stack as well - got an IPv4 and IPv6 Address. I configured the Windows XP SP3 PCs with both IPv4 and IPv6 Addresses, and now they are ping each other over both protocols at the same time. The Problem you'll come up soon is following: IPv4 and IPv6 are seperated stacks. No connection between both. So if you got an IPv6 PC, it won't be able to access IPv4 Ressources - and vice versa. So you'll need some kind of "Concentrator" or "Proxy" which will translate between both like an oversized NAT. Actually - thats the Name of that Translator: NAT-PT ("Protocol Translator") - its only one feature that can deliever IPv4-IPv6 Translation, but actually I read somewhere its considered "bad" already, so it might not be a good choice (and End2End Connection will suffer the same problems as your VPN on IPv4 with NAT.). I'm not putting an real solution for that problem here, as I'm diving into the Problem myself - but I wanted to just hint to this.
Thanks!

